Announcement
Collapse
No announcement yet.
[vb_side_1]
Latest Forum Posts
Collapse
-
by gjordanI’m trying to learn how to load photos. ...
-
Channel: BOM 2021 - Color My World
03-25-2021, 09:17 PM -
-
I am late to the party so I have only completed the 8 Small House 1 units so far. I realize this post is too late for everyone...
-
Channel: BOM 2021 - Color My World
03-24-2021, 11:30 AM -
-
by HelenWMost Color My World quilters probably think of you as the trouble shooter for all thing Color My World.
They may not...-
Channel: BOM 2021 - Color My World
03-23-2021, 06:47 AM -
-
I moved the first of the year but I had ordered the fabric kit. Now when I opened it i didnt find any directions or the...
-
Channel: BOM 2021 - Color My World
03-22-2021, 12:38 PM -
-
by midnight33I’m jumping ahead a bit....made brown fusible bias for tree trunks & now experimenting with dif shapes & fabrics...1 Photo
-
Channel: BOM 2021 - Color My World
03-21-2021, 05:37 PM -
-
by nhbasketsThought I’d start a thread where those of us using wool can post on progress when using this alternative medium for this...2 Photos
-
Channel: BOM 2021 - Color My World
03-19-2021, 04:31 PM -
-
Because I am using a dark background I plan to make lighter coloured trees. I know that the 14 yards of bias tape required...
-
Channel: BOM 2021 - Color My World
03-17-2021, 07:39 PM -
-
I can't find anything that mentions about what kind/size needle that is recommended if sewing with 60 wt thread on top and...
-
Channel: BOM 2021 - Color My World
03-14-2021, 08:04 PM -
Trending Forum Posts
Collapse
-
by gjordanI’m trying to learn how to load photos. ...
-
Channel: BOM 2021 - Color My World
03-25-2021, 09:17 PM -
-
I am late to the party so I have only completed the 8 Small House 1 units so far. I realize this post is too late for everyone...
-
Channel: BOM 2021 - Color My World
03-24-2021, 11:30 AM -
-
by HelenWMost Color My World quilters probably think of you as the trouble shooter for all thing Color My World.
They may not...-
Channel: BOM 2021 - Color My World
03-23-2021, 06:47 AM -
-
I moved the first of the year but I had ordered the fabric kit. Now when I opened it i didnt find any directions or the...
-
Channel: BOM 2021 - Color My World
03-22-2021, 12:38 PM -
-
by midnight33I’m jumping ahead a bit....made brown fusible bias for tree trunks & now experimenting with dif shapes & fabrics...1 Photo
-
Channel: BOM 2021 - Color My World
03-21-2021, 05:37 PM -
-
by nhbasketsThought I’d start a thread where those of us using wool can post on progress when using this alternative medium for this...2 Photos
-
Channel: BOM 2021 - Color My World
03-19-2021, 04:31 PM -
-
Because I am using a dark background I plan to make lighter coloured trees. I know that the 14 yards of bias tape required...
-
Channel: BOM 2021 - Color My World
03-17-2021, 07:39 PM -
-
I can't find anything that mentions about what kind/size needle that is recommended if sewing with 60 wt thread on top and...
-
Channel: BOM 2021 - Color My World
03-14-2021, 08:04 PM -
[vb_side_2]
[vb_main_1]
V8 Software - Enlarging Single-Stitch Lines
Collapse
X
-
-
-
-
Filter
-
Administrative
new posts
-
V8 Software - Enlarging Single-Stitch Lines
Hi all. When enlarging an existing design, would you change a single-stitch line to a double-run or triple-stitch line?
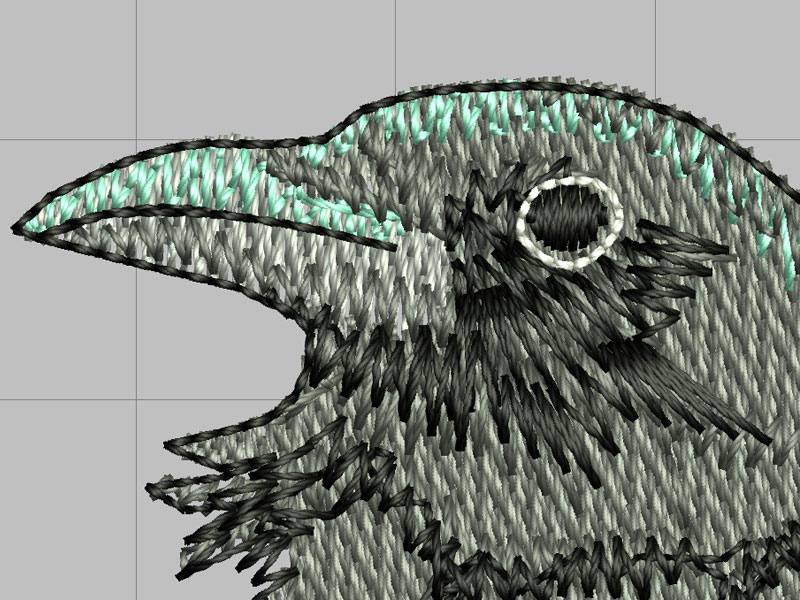
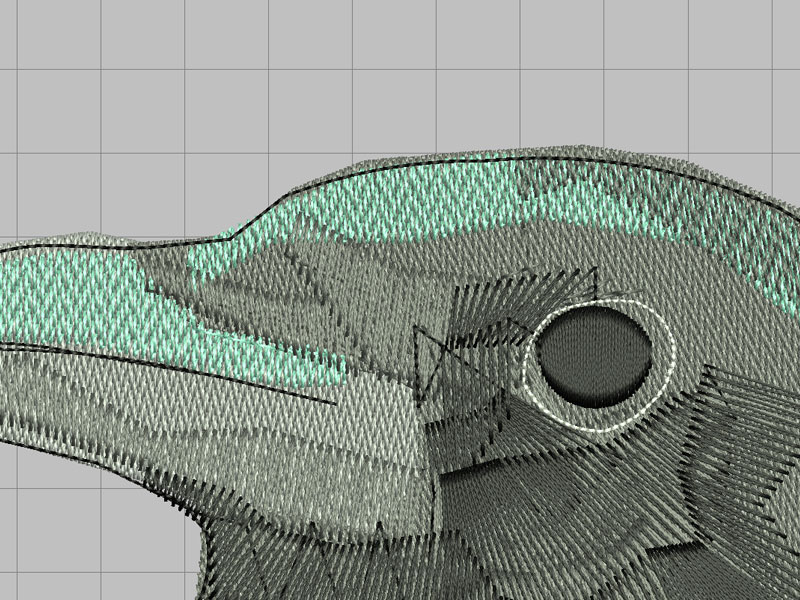
Am enlarging an ART file, so the stitches recalculate to fill in any satin-stitch areas no problem. But for the single-stitch lines, all it does is add more stitches along the line. As the original design relied on the thickness of the thread, the single-stitch line may no longer be thick enough. As per the examples below, the black outline is a little off the contour now, and the white highlight around the eye I fear would be lost.
ORIGINAL

ENLARGED

Would you increase a single-stitch line to double or triple? And if so, when and which one? Or just leave as is? Thanks!
"Neglect not the gift that is within you..." -1 Timothy 4:14Tags: None
- IP
-
Is the ART file an A-grade when you open it in V8?
I ask because if the ART file is not A grade you should not enlarge the design very much. By the look of the software rendering in the pictures you show it looks like it was not an A grade. Back to your questions. The outline should always be "off" because of pull-push when stitching the design. Where the fill is perpendicular to the outline you need to put the outline inside the fill shape. You can easily change the outline to triple stitch but that is no guaranty that the line will fall where it should. You should do a test stitch to see how your enlarged design stitch before you do any tweaking. You will quickly find out if it is a good idea to enlarge the design. If the grid is the same in the two screen shots you have enlarged this a lot and to be honest that is not a very good idea. I know it is being said around the internet that you can enlarge/reduce a design by 20% but I as a digitiser do not think that is a good idea. If I want to enlarge a design by 20 % I find I have to change a lot of the object properties to get a good design. That is easy when you have the original object file; "A grade" in the case of Bernina software; but if you work with a design that has been brought in with a lower grade it is much harder to enlarge and you get odd things happen.
Could you go back to the digitiser and ask for a larger design? That would ensure you got a very good design in the size you need.
Marianne
- IP
-
Vendors do not tell you what version of ART or what grade you buy. Only when you open the design in Bernina's software will you see the grade. It is down in the lower right hand corner. If you have V8 software the ART file needs to have been digitised in V8 to be grade A as far as I can tell; if you have V7 you cannot open ART80 but ART 70 will be grade A and so forth down the version numbers. The only way to know this before you buy is to contact the digitiser and ask.Originally posted by "NanaPie" post=142775Thanks for your post, Marianne. I just learned from you! How do you determine if a design is an "A-grade"? I download files often for use on my granddaughter's clothing, but have not seen the "A grade" noted with various vendors.
HTH
Marianne
- IP
Comment
-
Hi GeorgeAndrewP!
Since you are primarily concerned with the outline around the bird and around the eye, you might want to try these fixes to the enlarged design:
(1) for the outline around the bird, select the reshape tool and go around the object moving the line so that it is where you want it to be;
(2) for the outline around the eye, delete the circle that is there and then you have two choices:
(a) select digitize, choose closed object and right-click around the black eye with a triple stitch; alternatively, you can
(b) select digitize, choose the elipse tool and create a circle (enter center point, enter circumference, then hit enter again) the size you want around the eye choosing again a triple stitch outline.
This assumes that you like the way the rest of the bird stitches out enlarged.
Hope this helps.

- IP
Comment
-
Cool project! Not sure if your Q was asked and answered but if not and if I understand what you’re asking correctly, I would just edit the outline as you’ve photographed to pull it closer to he edge of the field stitches using Reshape Object tool. I only use V7 but assuming it’s still an option in V8 - it’s my fave tool!
If you use that tool you can easily test the waters to see if you want to increase the thickness or change it to a different stitch type altogether like a Stem stitch or Satin etc. That will work on the ‘eye’ highlight too. Just a thought.
I’m new here so my apologies if my post makes no sense


- IP
Comment
-
Hi everyone. Thanks for the advice.
I went ahead, opened it in V8 and resized it (ended up just slightly larger than 200%). It all looked good (being an ART file, although only ART B, but V8 handled it wonderfully), except for the outline around the eye - was just too thin as a line. So I deleted the original as suggested by Renata, and replaced it with a re-shaped oval. But I applied a thin satin stitch to it, playing with the stitch width until it looked right.
Hooped the fabric and a medium-weight tear-away, then tacked down a water-soluble on top, since the shirt had a bit of a nap to it. Isacord on top, black bobbin thread on the bottom (making sure to thread the BERNINA bobbin correctly for embroidery!) A few hours later, was done and looked great. Removed the tearaway, a quick wash, then a press with an OESD Pressing Cloth - worked wonders on the last wrinkles.
Daughter was thrilled - she thought that the shirt came that way! Guess she was happy, as she wore it to her 20th birthday party the next day!
Thanks again, everyone.

- IP
Comment
What's Going On
Collapse
There are currently 238 users online. 0 members and 238 guests.
Most users ever online was 4,446 at 07:08 AM on 07-28-2025.
Forum Stats
Collapse
Topics: 7,646
Posts: 144,737
Members: 16,641
Active Members: 5
Welcome to our newest member, Lev Anderson-LevTest1.
Latest Topics
Collapse
There are no results that meet this criteria.
Trending
Collapse
There are no results that meet this criteria.


Comment